2.26.2013

Heidi Swapp + monochromatic madness

Today's post was first seen on Heidi Swapp's blog. It introduces some new product. Some re released product. And some product that I have hoarded stashed away. Hope you go and visit to see it all in one place.
and then come back here for detailed instructions.
it is a bit of an aggressive project...
but i would love for you to play along.
jmpgirl ~ heidi swapp monochromatic madness

O.K...there are a lot of supplies that go into this project. But it is sooooo worth it.
It was  inspired by Heidi's video here explaining her Invisible Binding Technique. I would encourage you to watch the video first to understand the Invisible Binding. Then I would encourage you to read through the instructions first before starting. And please let me know of any questions you may have. Would love to know if you make this project.

jmpgirl ~ heidi swapp monochromatic madness

supplies:
Color Pop Mini Memory File
Color Magic 12x12 Paper
Color Shine Tinsel
Clear Pop Banners
Mini Instaframes
Color Magic Arrows
Color Magic Hearts
Color Magic Seam binding
Black and White Letters
Color Pop Window Frames
Clear Pop Tags
Color Shine Black Velvet
No Limits Triumph Stix
Black and White Buzz Words
Clear Pop Bare Pockets
Color Magic Notes
Color Magic Banner Delights
Color Magic Butterflies
Color Pop Memory File Tab Stickers
Day Glow Photo Corners
Clear Pop Tabs
Color Magic Stars
Color Magic 8x8 Papers
Color Magic Jumbo Tags
Clear Stamps

what else you will need:
paper trimmer
paper towel
adhesive
black acrylic paint
washi tape

(the instructions for a particular photo will be under that photo)

jmpgirl ~ heidi swapp monochromatic madness

for the cover::
Start with the black and white Color Pop mini memory file. Fold the file at the farthest folds so there is about a 1/2 inch spine.
Trim a piece of the Color Magic 12x12 Paper to a 5 1/2 inch wide by 7 1/2 inch long. Spray with Color Magic Tinsel. Buff with paper towel and allow to dry. Adhere to the cover of the memory file. Wrap edge around bottom edge
Trim a small piece of Color Magic Paper so that it fits inside the Mini Instaframe. Place inside and adhere closed. Add title. Attach to file cover.
Spray Seam Binding with Tinsel. Edge a Color Magic Heart and Arrow with black paint. Staple seam binding and heart to the edge of the frame. Add arrow.
Staple Clear Pop Banner to the top edge.

jmpgirl ~ heidi swapp monochromatic madness

Inside::
Spray a piece of Color Magic Paper with Tinsel and Black Velvet Color Shine. Attach to the left side of the file and trim edges. Do the same for the right side.
Place photos, heart and arrow (edged with black paint), and Black and White Letters for title in a pleasing manner on the left side. Add a notched piece trimmed from packaging.

jmpgirl ~ heidi swapp monochromatic madness

photo stack:
This was created using the video Heidi Swapp created for My Craft Channel found here. Watch video to understand how this is bound. You will need seven binder mechanisms to create the pages shown here.

jmpgirl ~ monochromatic madness

This is the front of the book. But let's start with the last page...


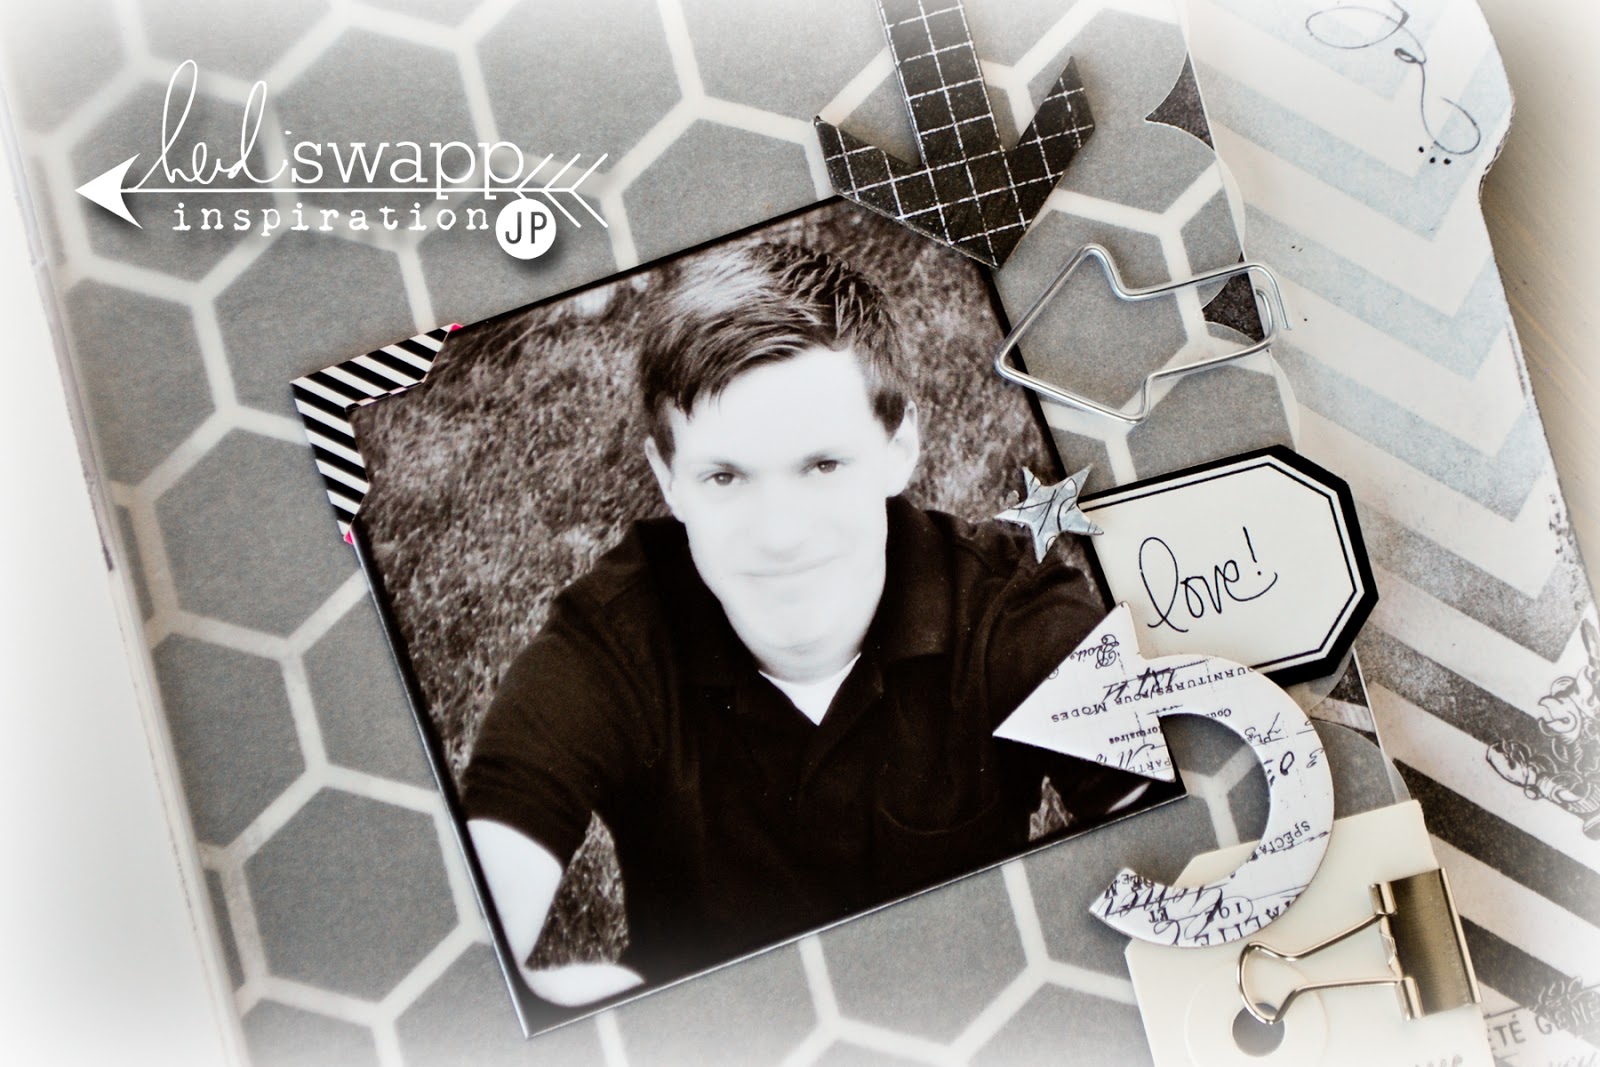
Spray a piece of the Color Magic 8x8 Paper with Black Velvet Color Shine.  This page measures 5 inches wide by 8 inches long. Add paper to the binding mechanism as shown in the video. Adhere a piece of vellum that is trimmed with a border punch to the sprayed paper. Add adhesive to the center which will be covered with the photo.
Add photo with Day Glow Photo Corner.
Place an arrow sprayed with Black Velvet to the top edge allowing it to peek over the edge. Add clips, stars, tags, arrows and labels to embellish.

jmpgirl ~ heidi swapp monochromatic madness

Spray a piece of Color Magic Paper with Black Velvet. This page measures 4 inches wide by 8 inches long. Staple a Clear Pop Tab to the edge.
Color the edges of a Jumbo Tag. Trim out the center leaving the border. Staple this to the Color Magic paper. Add to the binding. Place photo over the binding mechanism to cover.
Add banners, stickers, labels and stamp to embellish further.

jmpgirl ~ heidi swapp monochromatic madness

For the next page, a file folder pocket was cut with the Silhouette. It was sized to 3 3/4 inches wide. Attach to the binder mechanism.
Add Color Pop Window Frame to the page and then a photo on top with foam tape. Embellish further with arrow, banners, and paper flowers.
Add a label to the edge and back with another label.

jmpgirl ~ heidi swapp monochromatic madness

For the next page adhere two Color Magic Notes back to back with the binder mechanism sandwiched in between. Add photo.

jmpgirl ~ heidi swapp monochromatic madness

Next page is the Clear Pop Bare Pocket. Add to the binder mechanism. Slip the photo inside to cover the binder piece. On the back of this page add a Color Magic Note and embellish further with hearts and stamp, and a clip at the top.

jmpgirl ~ heidi swapp monochromatic madness

The page with the kids group photo: attach photo to the front of the binder mechanism. Add a piece of pattern paper to the back to cover the rest of the binder piece. Embellish that side further with No Limits Triumph Stix, arrows and washi tape.

jmpgirl ~ heidi swapp monochromatic madness

Spray a Color Pop Window Frame with Tinsel on the front and Black Velvet on the back careful not to get the black on the front part (like i did). Attach the frame to the very front binder mechanism. Cover the back binder piece with washi tape. Staple the #GRATEFUL Clear Pop Tag to the front of the frame.

Whew...if you made it this far you are my hero.

I love this Memory File.
Please link me up if you create one of your own.

2.25.2013

project life 3 & 4

Welcome to Project Life 2013

 Well hello end of the month of February.

jmpgirl ~ project life 3 & 4
week 3 & 4
Although it is the 25th...the month ends in just a few days...
and just where has it all gone?
Life has been so utterly busy of late.
Many projects and assignments due.
And what a week last week was with all the happenings with Heidi Swapp and Michaels. The media team is so excited for all that has happened with that event. It has been such a fun ride!
But I have not forgotten project life.

jmpgirl ~ project life 3 & 4
week three

Nope...cannot forget Project life..
O.K...so I have fallen off the Bright Ideas class that I started at the beginning of February.
And I have fallen off keeping up with the blog the past few weeks.

jmpgirl ~ project life 3 & 4
week four
But project life stays on the front burner.
I say that as week's three and four are just now posted.
Those spreads stayed fairly basic. And neutral.
Had to keep it doable while in the middle of a busy project schedule.
But that is one of the beauties of this kind of project.
One does not have to do double page spreads.
One does not have to even do a single page spread.
One can simply do a single page, 8 1/2 x 11 traditional layout and call it good, if one needed.

jmpgirl ~ project life 3 & 4
weeks five and six
After keeping the first four weeks very basic and neutral in tone...
i needed some color.
A combination of new Amy Tangerine + Allison Kreft for Echo Park (love her stuff), plus a sprinkling of Simple stories was just what was needed.

jmpgirl ~ project life 3 & 4
week five

Oh...and did I mention finding some Maggie Holmes stickers and Glitz Design washi tape? A new favorite.

jmpgirl ~ project life 3 & 4
week six
Heidi Swapp's Valentines Digital printable was perfect even before Valentines Day. Just print and trim and they are versatile enough for any time of the year.

jmpgirl ~ project life 3 & 4
O.K..I am laughing here...forgot to add the photo of the little mr. to the "crazy love' tag.
So glad one does not have to be perfect to post these things...

jmpgirl ~ project life 3 & 4

This side for week six was a single event. Our annual Grand Prix racing event. The girls  designed thematic cars, and the mom made team shirts for the fam. The photo of all the trophies for the event did not fit the mood of the page. So I slipped it into a glassine bag so it could still be apart of the weeks photos, but not mess with my colors. See what I'm sayin'?

jmpgirl ~ project life 3 & 4
So how are you keeping up with your projectLife?
Would love to know what is working for you.

2.15.2013

101 ideas media team hop

Welcome to the 101 Ideas Media Team Hop!!!


heidi swapp 101 ideas
Thank you so much for joining Heidi and the Media Team on this very special reveal. As you may or may not know by now, Heidi Swapp products are now available at Michaels stores nationwide. That means there are over 60 fabulous products unique to the Heidi Swapp brand available to so many more creatives. How great it that? So often we hear the question, "Where can I find Heidi's products?" Well now they are available in a new way and we are so excited.

So what is the 101 Ideas you ask?
There are to be 101 Ideas starting today found here.
101 Ideas new everyday, with downloadable pdf instructions.
101 Ideas new everyday showcasing the fabulous products found at Michaels...exclusive to Heidi Swapp.
You don't want to miss this. It's huge!

So how about some fun and a giveaway to go with those 101 Ideas.
Here is Heidi to share that part with you::
SO... WHO's on INSTAGRAM?? WHO lives by a MICHAELS!?? WHO would LOVE to WIN goodies to MAKE PRETTY STUFF?? i will be giving away several prize packages coming up next week to celebrate the launch of these products! here's what you need to do to ENTER:

1. go to Michaels and take a photo of the Heidi Swapp display!! (no purchase necessary... but i'd love to see what you are picking up!)

2. post it to instagram and TAG ME @hkswapp AND post with hashtag: #HeidiSwappatMichaels

3. tell me what Michaels you are at!

i'll be looking for winners in the #HeidiSwappatMichaels gallery!!
So did you catch the over 60 fabulous products part? Um...yep.
Well I was asked to pick one of my favorite and share them here with you...
um...what? just one?

Well, never being one to stick to the rules, I picked two.
Can't wait to share with you.

First up...
this ever so fabulous Mini Memory File Album...
did you catch that? An album...so if you know me...you know I HAD to pick that as I adore me a mini album...

heidi swapp ~ mini memory files album
This little gem is a little bit of everything. The main shape is a memory file, and throughout the album there are tabs and different patterns as well as differing shaped pages made of heavy card stock. It's just a great foundation for telling a great story.
Here is a peek at what I got to do with it..

jmpgirl ~ mini memory file album

It is pure sweetness. Can't wait to get my hands on more of these. oh the possibilities.

Do you want to see another product? New and never seen before?

heidi swapp ~ 8x8 color magic paper michaels

This is Color Magic 8x8 Paper Pack. Another brand new product. 
A little tough to see in an image like this...
so if you are anywhere near a Michaels, you just have to go and get some for your self.

Here's what I did with this...

jmpgirl ~ heidi swapp confetti paper card

These specialty papers are so perfect for cards. Just fold in half, color with Color Shine, and you have an easy card base. I went real soft with this one so the Gold Lame is very subtle here. But I love the effect on this confetti resist pattern.

I would love to know what of these products is going to be your favorite. You can look at all the offerings here.
I would love to know what you do with these fabulous items.
I would love, too, if you would tag me on instagram with any project created using this line. @jamiepate

Now I know you want to see more...
so there is a hop going on just for the occassion...
If you started here, you are going to want to go to Heidi's blog for the beginning.
But after here please head on over to Maggie's site as she is sure to be gushing too about these products.

Heidi Swapp's Facebook Fan Page

But wait...there's more...
please join Heidi Monday night for a Live webshow that is the official kickoff of 101 days of ideas. 
I know I will be there.

2.13.2013

it's not too late

Valentines Day is tomorrow...
are you ready?
I have to say, I am more ready this year than ever...
later I will share some gifts I have made for those here at home to show them my love...
but today a couple of cards...

jmpgirl ~ valentines printables

This was created using HeidiSwapp's Valentines Papers. I simply printed out several patterns.
Constructed a card front plus some Heidi and Pink Paislee embellishments...

jmpgirl ~ valentines printables

Did the same to the inside...
added an openable mini book...
plus there is a pocket with a photo hidden away inside...

jmpgirl ~ valentines printables

This true love card was made with her Happy Valentines Printable Cards...
no photoshop skills needed...
simply download the product.
print out the pdf's...
she even includes instructions...

jmpgirl ~ valentines printables

and then embellish them inside and out..

jmpgirl ~ valentines printables

These cards include stickles...
and Color Shined seam binding...
a few of Heidi's Cutting Files...

jmpgirl ~ valentines printables

washi tape here and there...

jmpgirl ~ valentines printables

I added tags...and clips...and hidden messages inside pockets.

I find true pleasure in creating handmade goodness for those I cherish and love...
it really is an uplifting boost to my heart...
as well as to the one I share that goodness with...

Now go...while there is still time...

show your love by creating with love.

 oh...and have you seen this?

See here for more details...sort of...

2.05.2013

valentine + memory file love

hello. i am over at Heidi's today...
sharing what I call a Valentine on steroids.
combine Heidi's Memory Files + photos + words...
and you get a fabulous gift.

jmpgirl ~ heidi swapp valentine memory file

this gift was made for my oldest daughter.
for valentines.
because i don't share my love like this very much with her

jmpgirl ~ heidi swapp valentine memory file

and she is always asking for more photos to display in her room.

jmpgirl ~ heidi swapp valentine memory file

now i know...she is old enough to make and create her own pretty stuff...

jmpgirl ~ heidi swapp valentine memory file

but she wants it from mom...

jmpgirl ~ heidi swapp valentine memory file

so how do you share your love with your kids at Valentines Day?

jmpgirl ~ heidi swapp valentine memory file

i think they would adore some love from you by way of photos. pretty photos. and sweet words.

jmpgirl ~ heidi swapp valentine memory file

it does not have to be complicated...

jmpgirl ~ heidi swapp valentine memory file

keep it simple.
but show them your love.

Now, off to make the rest...

2.01.2013

project life wk 1 & 2

hello february.
loved january.
busy.
productive.
dream worthy.
it was a great month.
can't believe we are now entering the second month of this year twenty.13.

jmpgirl ~ project life 2013

and yes.
yes i do participate in project life.
who knew?

so happy today to share weeks 1 & 2 with you.
week 3 is in the works.
but had to take a back seat to a few other projects right now.

so for today...
let's talk 1 & 2.

jmpgirl ~ project life 2013

if you are new to project life here, here is a bit of what i do for every week.
i always have a larger photo (if possible) of the two year old. it is almost always in one of the top pockets. i absolutely adore tracking his life with this weekly photo.

i always have a pocket designated for the date and week.

jmpgirl ~ project life 2013

i used the studio calico 3x4 calendar card to designate the month of january. i sized the png down in photoshop elements, and kept it light grey. i just liked the very subtle font color. i will change it for future months.

jmpgirl ~ project life 2013

another thing i do is keep to a congruent color story. i am totally loving grey...still...
so grey tones is what i kept with for this first month...
these pages are very mellow in tone, but i hope it's the photos that really tell the story in the first place.

often i will add a traditional layout insert to tell a story.

jmpgirl ~ project life 2013

my thinking was that this photo did not really fit with the story. but it was an important photo to me. my daughter and her very good friends. i so love these girls together and am thankful for their relationship that it deserved it's own place in our family's story.

jmpgirl ~ project life 2013

it is always good for me to pull out my favorite embellishments and paper and just play. hmmm...maybe that was what i was really up to.

now go...
if you are on the fence about projectLIFE, i cannot encourage you enough to jump over and join this amazing journey of story+photo.
hope you will follow me as i keep up with projectLIFE 2013.