strengthen your strengths

9.30.2011


my brother in law recently shared that saying with me. it has stuck.
it is a necessary focus when we creatives want to compare ourselves to others...
or think we never add up.
perfection can be our enemy.
adjusting one's thoughts on what is strong within us, and working them to their end is a virtue that will only give way to more creativity and inspiration.
wanted to share that with you by way of some digital art courtesy of RhonnaDESIGNS.
i am working on a series of wall art with quotes for the girls bathroom. i want them to read everyday words affirming the direction they should go in their day. focusing on their strengths vs. weakness is a battle every girls has...so i hope to inspire them.
supplies:
font: traveling typewriter

Rhonna just put up super hero fun::


there are twelve new kits in the shop
+ the newsletter is just out...are you getting yours...it may be worth your while!!!
and i have a feeling some ones' sixteenth birthday might be fun and festive with a little kapow going on.

tomorrow...Work In Progress gallery goes live...

till then...

variation on a theme

9.29.2011

Today I am over at Work In Progress.
I have a post there is highlighting these layouts...
and showing how far a scrapbook kit can go...
and how to make an album come together easily...


I hope you will stop by and say hi!

this and that

9.28.2011

Did you get a chance to hop over to Rhonna DESIGNS yesterday and see this weeks Creative Team Tuesday post?
the creative team is so diverse and contributed some lovely projects in hybrid and digital.. Very inspiring pieces for fall. halloween.and everyday.
go. look. see.
and i encourage you to check out the creative team's blogs too...they are an amazing group of talented ladies...i still feel so honored to be on this team. 

Today Rhonna is featuring a closer look at the Grateful Glam kit on her blog. I LOVE THIS KIT. I am eager to play with the new Grateful Glam and have a few projects in the works.Come back next week for those. If you ever decide to create a little here and there with any of her kits, please link me up. Would love to see what you do. Would love to show them off here.

And have you signed up for the newsletter yet? On the home page of the shop there is a place to do just that. I am thinking there is still a 25% discount to be had for her shop. Hope you go and take advantage of this offer. And show me what you come up with.

in other news...
This week Work In Progress will be posting October's gallery...beautiful papers by Pink Paislee were to be found in this months kit.
Here is a sneak or two...or three...


A little announcment here::


i am attending Spark the Event this year. And would love to know if any of you will be in attendance. It makes me so happy to meet my internet friends. You all are a wonderful source of inspiration to me. So if you are going...please let me know.

And lastly...finally getting some much needed editing done... Sawyer Anthony's twelve month photo is mostly done...and I leave you with that today.

spooky junque

9.26.2011

Good Monday morning friends...
I am back in full swing here with lots to share with you this week.
Rhonna has been at it again with her Spooky Junque line of digital goodness.
How is it that Rhonna makes even Halloween beautiful?


The 
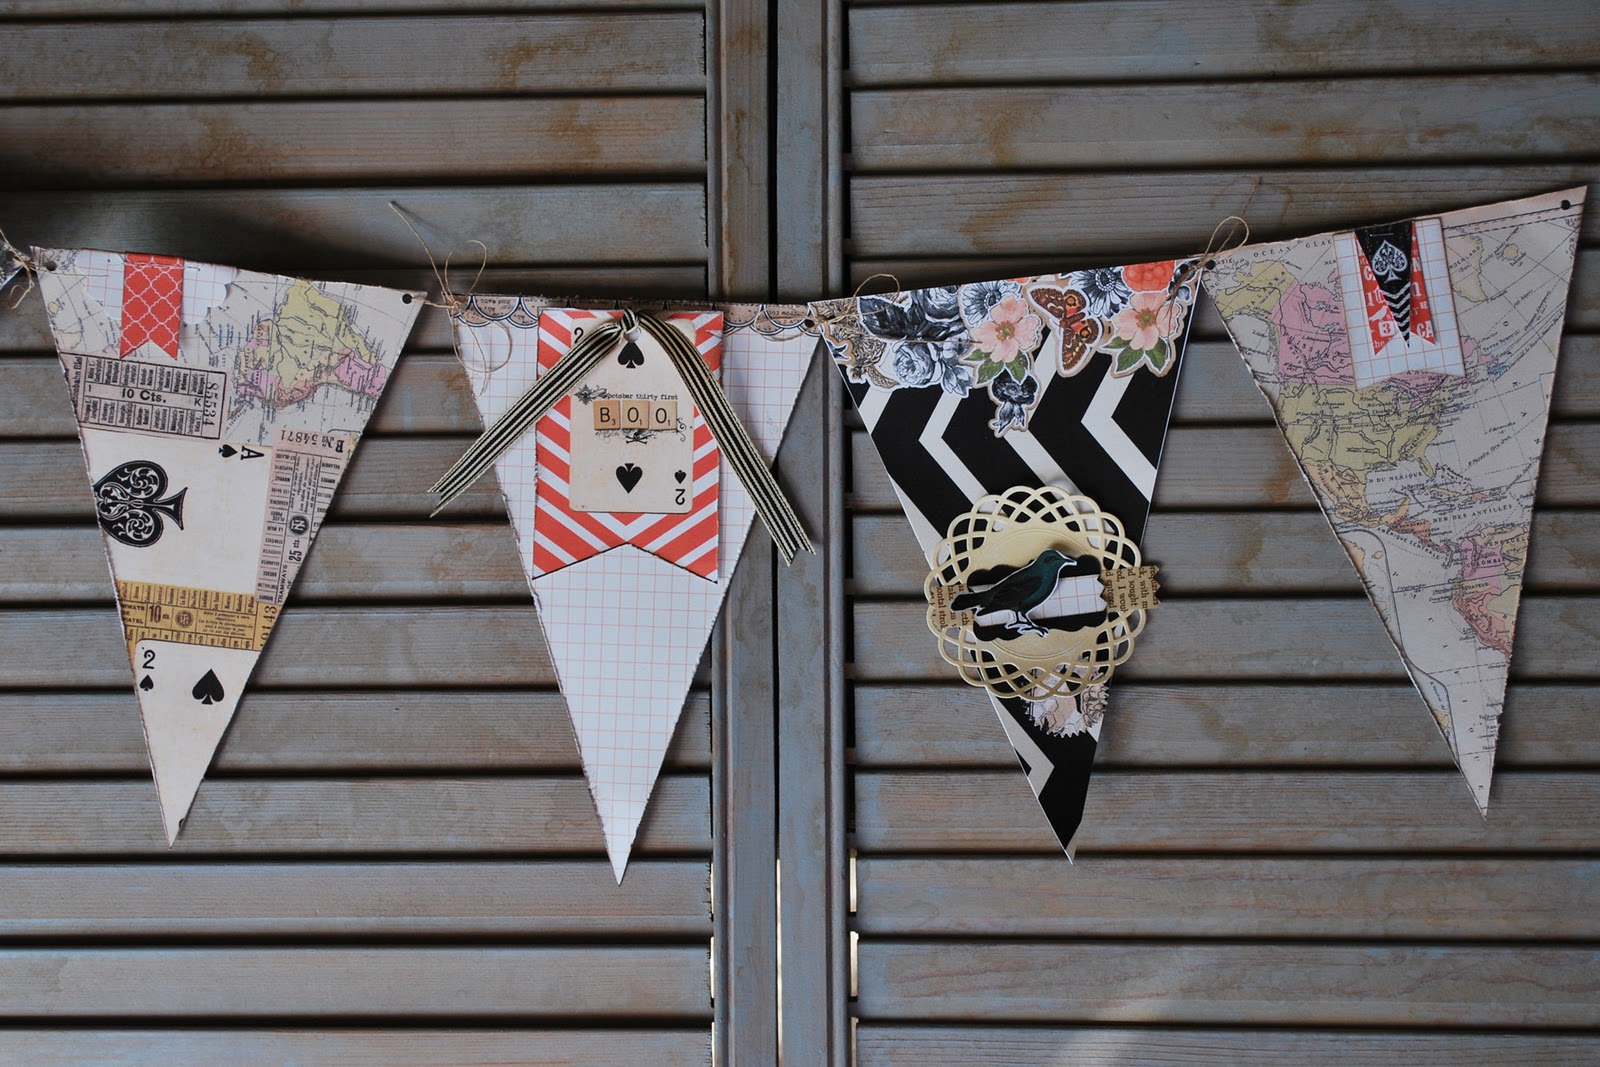
Spooky Junque Banner Kit is a perfect printable for those of you not quite ready for the digital world. The kit allows you to simply print and cut and alter. Here is my take on this banner kit::


I used eight flags to make my banner. Punching tiny holes in the top they were connected with vintage thread I procured on one of my antique travels. My suggestion, whenever you come across anything slighly useful like a whole spool of vintage thread that is unique and one of a kind...grab it up. You will not be sorry. I use this thread all the time. So happy to have found it.


This burlap striped print is one of my favorites. After I printed and trimmed each flag, I distressed the edges with the edge scraper from this kit, and used my blending tool to add some ink and additional distressing. This particular flag is layered with a Martha Stewart doily that is altered with a paint dabber in sandal. A butterfly was die cut from another pattern of the flags, and then attached with a stick pin.

The quatrefoil flag is adorable. There are bonus images that come with the flag printable. For this part of the banner, I simply trimmed and adhered those extra elements. The mini flags on the top are already in that shape and one only needs to cut them out, as I did here, and sew them to the top of the flag. The floral image was fancy cut and popped up to give this flag a bit of dimension. (fancy cut is when at image is trimmed right around it's border).

Do I not love this pattern? Yes I do. O.K...so there are alot of favorite patterns to this kit. They would make lovely papers all of them. This is what I mean about making Halloween even beautiful. The original intent of this kit was more along the lines of the scary holiday, but I turned it to be more of an autumnal feel. These papers were more than willing to comply. This banner above is also layered with a Martha Stewart die cut doily but painted with a black dabber. Then kraft paper was die cut as a label and then stamped in black using this stamp collection. The spade, a bonus image on the printable,  was 'fancy cut' and popped up on the label die cut for another take on this banner.

Some of these banners were so beautiful left just as they were, with no need for too much additional embellishment. This one for example, only needed a scalloped punched pattern and a trimmed out mini flag sewed to the top to set it off. Love.

Another real simple version. The flag was trimmed and distressed, then I cut out the orange chevron and card image from another flag image, and attached with a black and cream trim from my stash. Easy.

Love me this chevron pattern with the floral touches on the top! You will notice a bit of a pattern I am following here. As with a few other of the flags, this too is a layered die cut doily, painted, and fancy cut pieces of the bonus elements. I treated one of the pattern paper pieces like a piece of tape and trimmed the edges with pinking sheers. The bird is an image on the printable. He is trimmed out and  popped up on top of the layers to add dimension. Very doable, and one only needs to repeat the embellishment to create a divine banner.

The map pattern flag is found on both ends of the banner. The embellishments are the same on both of them to give it a look of completion. Just print. Trim. Distress. And add mini flags.


I trimmed more mini flags + used the Grateful Glam Tags N Flags kit to make some extra embellishments.
These kits are endless. And I look forward to sharing even more of them with you.
If you have any questions about what you see here, please leave me a comment, and I will be so happy to get back to you.

back with both feet

9.23.2011

Here I am...
have been back all week...
but jumped into life here with both feet on Monday...
and have barely stopped since then.
New projects in the works...so excited!!!
A class I am preparing for...details to come...
October's Work in Progress spralled out in my studio waiting to be played with...
sigh...so much to do...so little time...very giddy inside.
So grateful for a fabulous time away and will share THAT story next week.

Here is a little sneak of what else is in the works...will reveal next week. Having a time decorating the house for fall. While the cooler whether months are not my favorite time of year, I compensate by warming up the inside and making it festive.


Stopping in to say hi today and encourage you to go and sign up for Rhonna's newsletter where there just might be a discount for your own personal use you do.


Go visit here, on the home page of her shop, and sign up for the newsletter...it won't dissappoint.

And have you been keeping up with her 'How Do You Do That?' tutorials. Fabulous. I myself am learning so much. Rhonna is so generous with her talents. GO check it out.

this weekend...

9.15.2011

off to a much needed girlfriend getaway in sunny san diego!

back next week refreshed. renewed. and rejuvenated.

friendship

9.14.2011

Few people are blessed as much I am with the gifts of not only one life long friend...
but two life long friends...
we have laughed together,
& cried together.
taken chances together...
played it safe together.
we have endured death together...
and celebrated lives born.
we hold one another accountable...
as well as allow lots of grace to flow.
we've been angry...
and made up.
but most of all we have been the wings beneath each other's wings through the days of our lives.

today we celebrate my friend bren with a significant birthday...
bren...i am so proud of you for taking chances and going after what you want...
thank you for truly being the wind and breath of air i have needed through the many chapters of my life...
i love you and don't know what i would do without you!

a story of a lovely lady

9.13.2011

Today I share a special story with you.
A special story of a lovely lady...
my middle daughter, Amelia.
We call her Gracie.


With the help of the September Work in Progress main kit, I am telling the story of this lovely lady.


This lovely lady is indeed sweet.
She is ten.
She loves to be outdoors and explore and discover.
She loves to tell stories, and study about horses.
It's a mystery to me how she knows so much about horses...


because this lovely lady is at a first grade reading level.
Yes, we have done the vision therapy.
Yes, she has seen a therapist or two.
Yes she works at reading every day of her life.
But some say she is deeply dyslexic.


Can you imagine how hard it is for a bright little girl, with a desire to know so much, to struggle with her reading challenge. I mean...she really struggles.


So this is her little story. I used the 6x6 Kraft mini album from the kit to document this journey.
The left side of the layout is a pocket made with one of the pattern papers from the kit. The pocket is home to some sort of progress, or maybe even a set back, that I have documented.
The right side is a series of recent photos of Amelia. The composition is similar from layout to layout. Her photo is the focus. It is framed with stickers from the Basic Grey out of print stickers. More of the same stickers are used to add interest and color. Sequins are added, as well as butterflies. I want her to shine like the stars in the heavens, as well as find the freedom to fly even though she struggles. I used particular words from the DCWV Retro Sayings paper. Words like sweet, smart, good as gold, living art...because she is all those things. And more. That was how she was created. God knew she would have to be stronger than her struggle. And I guess, He knew the perfect girl to chose.


If you have a child who struggles academically, or in any other arena of their life, know you are not alone. There are a lot of us out there. Lot of tears shed. A lot of research done. And a lot of hope always renewed.

Thank you for letting me share this story today.
you can find me today over at work in progress with the same post.

the album in it's entirety can be found here.

a little monday bling

9.12.2011

the events of the weekend have left me emotionally drained.
i did not even know how to post anything of significance over the weekend.
instead i felt some quiet reflection was in order.
it amazed me how close to my heart i continue to carry what happened on 9/11...
and i continue to be hopeful and prayerful for our country in the days ahead of us.


i have had the need to make a few pieces of wearable art again...
been a long time.
Rhonna's word art inspired this piece here.
and this is what  i used::


she lived word art is only $2.00!!!
i'm thinking christmas already.
desk top art, jotter notebooks, wall art...
lots of fun to be had with these words.

also used these classsic pieces::


the spring mix elements kit is finding it's way in more than the pendant...have some ideas for it for some bathroom word art projects as well. you'll just have to wait and see!
to make the pendant word art, i opened a document in pse the size of the bezel. I  played around with the digital element placement. printed and trimmed to size.
after placing the printed piece in the bezel, i then filled it with diamond glaze and let it set over night.
when it was dry, i attached the bezel to the chain, added the flower and butterfly, because i love me some dangling charms...and walah! done.

and Rhonna is at it again, creating halloween in her fabulous junque style...


there is even more in the shop.

she is promising some grateful glam soon...personally i can't wait for that!

create well...create often.

9.08.2011

Don't you just love that for the name of a creative blog?
Jen over at said Create Often has me up as her guest designer today.
Yes...me! Can you stand it?
She has an amazing line of up guest designers that you should really go read up on.
So, go and say hi!
I would be so honored.

a few more cards

9.07.2011

all made with september's work in progress...


kind thanks...

9.06.2011


This card, made using the September Work in Progress kit, is my sentiment to you.
To those of you who took the time this past week to flood my heart with congratulations,
by way of your many comments.
Your love and sentiments were overwhelming to me...
So please accept my little gesture of gratitude...
And join me this week for more from my studio...
you are all so appreciated.

blessings
~jamie