a favorite way to make
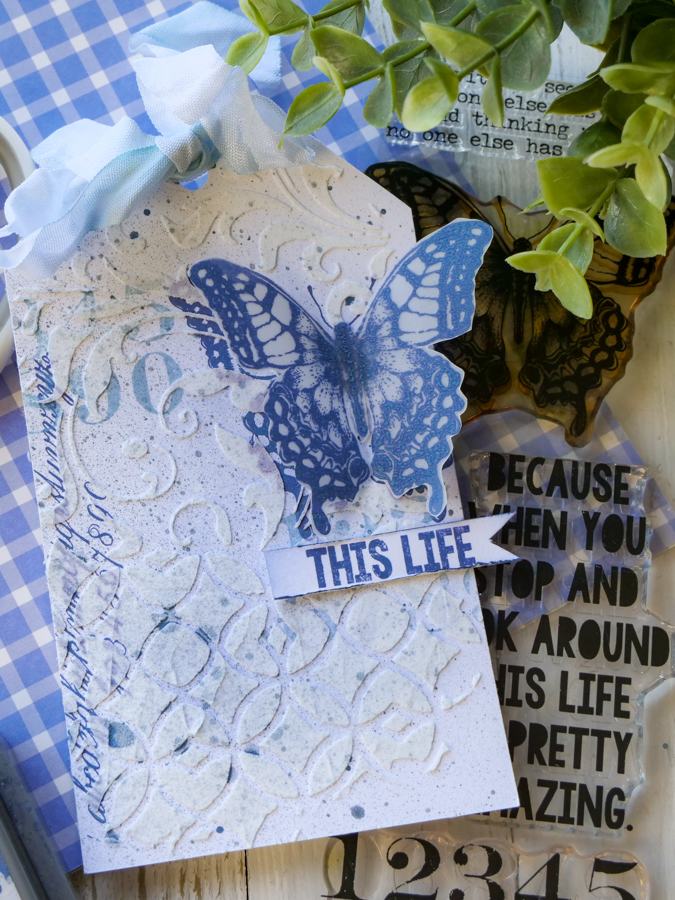
One of my most favorite ways to make beautiful stuff with ink and texture and that constant stream of inspiration in my brain is on a tag. Tags, like a MemoryDex card, are quick, very satisfying, and can add such beautiful creative touch to a scrapbook page or any way one documents life.
Recently I shared this tag tutorial on my YouTube channel. We walked through the process of making tags layered with ink, Distress Spritz, texture plus stamping. Oh...and I may or may not have gushed about the new GripMate Stamp and Stencil tool too. (As of this writing sold out...hit that Notify Me!). I will chat about that in a bit.
Whether you are new to tag making or simply looking for some inspiration, I think you are gonna like this project here!
👉 Watch the full video here: Mixed Media Tags For Scrapbooking
As always, a few things are needed for the making. And other things are optional. Also as always, I want to invite you to use your own stash (cause I know you got it) and get to making right now.
What You'll Need:
Blank tags or heavyweight cardstock (tag shape). My go-to is always Mixed Media Paper.
Ink sprays or distress inks
Stamps (background & sentiment)
Stencils and texture paste or ink
GripMate stamp and stencil tool
Ribbon, twine, or fabric trim
Find all supplies HERE.
In the Mixed Media Tag video tutorial, I share step by step how to craft the tags you see here in these images. If you are like me, you also like to read as well as watch. And if you are not like me, then just run over and watch. Cause that's fun too.
INKY BACKGROUND
Start with a Mixed Media tag that is die cut to shape or make your own DIY tag shape. Or any shape for that matter. It does not HAVE to be a tag. This tag is actually pretty simply inked in the middle with the Distress Oxide Chipped Sapphire. In the video you will see how after all was stamped that a layer of Distress Spritz in Uncharted Mariner was spritzed on as a finishing touch.
STAMPED IMAGERY
Using the fabulous Tim Holtz Mixed Media Stamp and Stencil 15 I then used only the stamps in that set to add inked imagery to the background. In the video we will make the tag that has the large butterfly hovering over all the inky layers. What you will discover is that simple little tweaks changes one tag from another. Love that!
TEXTURE WITH A STENCIL
Utilizing the GripMate not only helped with the stamped imagery placement, but it came in clutch for adding in the stencil too. Again, only using what is included in that Set 15 the stencil now creates another layer with texture paste. And again, in that video, we talk about how to keep the texture paste un-inked and what a stunning look that is as well.
STAMPED SENTIMENT
Yet again, variety is such a fabulous style when making anything. The video will share three ways to use that large quote stamp. As well as how I finally decide to make use of the sentiment as a prompt on a scrapbook page. Good stuff, I'm telling' ya!
A RIBBON FINISH
I almost always add some kind of fiber, ribbon, or twine to the top of a tag. I don't know...it just seems as though the tag should be styled with some sort of flair as a finishing touch.
One of the supplies used in the video tutorial is this (seen here covered in its packaging) new GRIPMATE from ScrapbookCom. Ok...this was a bit of some amazingness. Loved how I did not have to mess with magnets in my stamp platform. Which, can I just say, are really hard to pick up when your nails finally decide to grow up and get longer. I know...quite the problem to have. Anyway...the GripMate is sort of changing up my process now. It holds beautifully. And I am inclined to just keep it in the Misti Stamp Platform...for like forever!
A couple reasons this is changing the crafty ways for me:
- one can easily stamp and re stamp if need to for precise imagery
- the grippiness keeps stencils right where they need to be
- easy to quickly switch between making steps without shifting the project.
If you do a lot of small format work, this tool is a bit of a game changer.
OK...watch and create with me. Ready to see these tags come together and inspire you for the making? Watch the full video here and just enjoy the process:
Be sure and leave a comment. I absolutely love hearing from my creative making friends. I always do my best to respond in kind.
Keep making!


No comments:
Post a Comment