

holiday makes are here
I know we are primarily here for the story telling.
But I think our making can be part of our story as well as story telling too.
Part of our story AND storytelling can be decking the halls and tables and gifts for Thanksgiving or Christmas. Part of that story is then the photos we take capturing the paper crafted embellishments of our home. Part of that story is how we give back to our home or our space with these handcrafted elements.
Not to mention the slow down of the body and mind when we take time to simply sit and make.
It all works together for the good, no?
I say yes!
This week ScrapbookCom is hosting what is being called a Handmade Holiday Parade. For plenty of inspiration this season, follow this hashtag on Instagram: #handmadeholidayparade
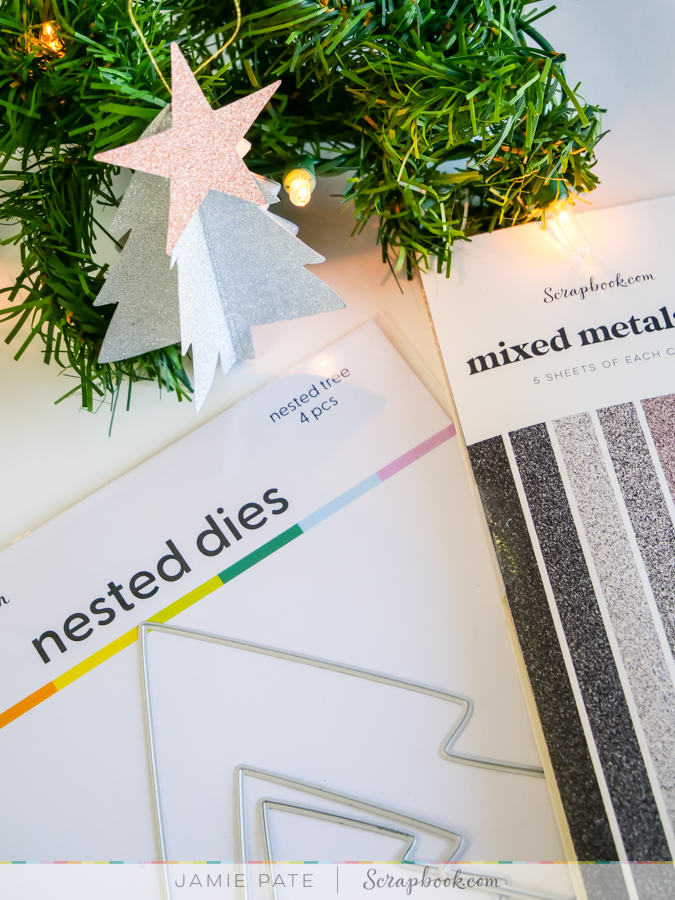
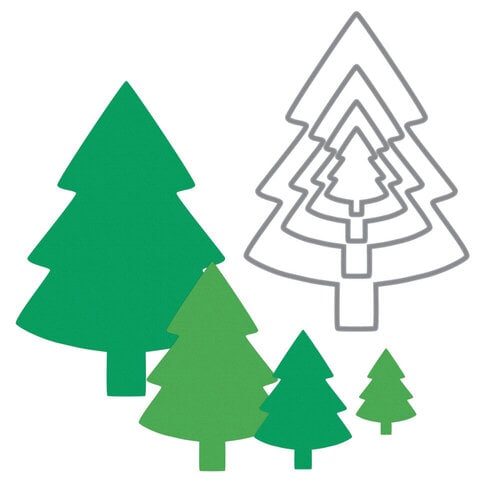
To start, several of us grabbed the new Nested Tree Dies from the shop at ScrapbookCom and went to play. The makes and inspiration that I have had a sneak peek at are Ah! mazing! People blow my mind all the time how creative and insightful they are. How taking a few metal dies they turned this craft tool into a myriad of ideas and gifts and decorations and even an album or two. (I have something in mind for that as well. Check back later in the week to see that revealed.)

For my makes (and actually I ended up crafting several ideas) I decided to craft a very easy DIY Ornament.
Using the Nested Tree Dies, as well as the Mixed Metallics Paper Pad, I cut the silver paper out with the 3rd to the smallest tree die. For each tree I cut out four shapes.

After they were all cut, I then carefully scored the tree in half down the tall middle. I say carefully because the glitter paper can get roughed up if one is not more on the gentle side of things. Then, I added Smart Glue to one of the scored sides and adhered that to another of the scored sides. Doing this with all four cut papers I then finished the last piece by adhering both it's sides to their respective tree shapes.
To add the hanger one can either lay a looped string inside the tree before adhering the last tree panel. Or, one could punch a small hole at the top of the tree and tie a string. Which by the way, this could be a fun package topper too. Just sayin'.

To top my tree I cut another color of the Mixed Metallics paper with the Winter Stars Sizzix Die. It's a bit over sized, but I actually love that! It gives the linear tree a fun and whimsical feel.
Now, here's the thing: one could leave the tree this simply done, or, one could add tags or little pieces of garland or use different paper and stamp! I purposefully created this idea to be very DIY. Even your kids or grands could be part of the making for that matter.
Remember, it does not have to be lavish or over the top. Your holiday makes tell their story with the love and care you put into crafting even the simplest of tree ornaments.
Enjoy the making and tell your story.
Hey friends...when you shop these links below, I receive a small kick back from your sales from ScrapbookCom & Heidi Swapp Shop. There is absolutely no extra cost to you at all! But these commissions help to cover the costs of this blog and other expenses to provide you with these and other project ideas. I want to continue to bring you FREE inspiration. Shopping these links allows me to do just that. I can't thank you enough for your love and continued support.
items used in this post:


No comments:
Post a Comment